Introduction to Pumpkin Crisp
As the leaves turn and the air becomes crisp, there’s something inherently comforting about the flavors of fall. One dessert that perfectly encapsulates this seasonal charm is pumpkin crisp—a delightful combination of spiced pumpkin filling and a crunchy topping that will have your taste buds singing.
Why Pumpkin Crisp is the Ultimate Fall Dessert
So, what makes pumpkin crisp the quintessential autumn treat? For starters, it brilliantly marries the cozy flavors of pumpkin with the warmth of spices like cinnamon and nutmeg. When you take your first bite, you’ll experience a nostalgic blend reminiscent of grandma’s kitchen on Thanksgiving morning. The beauty of this dessert lies not just in its taste, but also in how easy it is to prepare. If this is your first foray into baking, fear not! The recipe is straightforward, making it a user-friendly option that even novice chefs can conquer.
The versatility of pumpkin crisp is another reason it deserves a spot on your fall menu. Serve it as a delightful ending to a cozy dinner party or enjoy it solo with a steaming cup of coffee on a chilly afternoon. Did you know that pumpkin is packed with nutrients? According to the Pumpkin Nutritional Benefits from Healthline, it’s high in vitamins A and C, making it not just tasty but also a healthy option among desserts.
One of the best parts about pumpkin crisp is its adaptability. You can easily tweak it to suit your dietary preferences or what you have on hand. Whether you prefer a gluten-free version or want to add some chocolate chips for a sweet surprise, the possibilities are endless.
Imagine gathering around the table, sharing stories and laughter, as you serve up warm bowls of this delicious treat topped with a dollop of whipped cream. It’s these small moments that make the fall season so special. So grab your baking dish and let’s dive into this delightful recipe that is sure to impress family and friends alike!

Key Ingredients for Pumpkin Crisp
Creating the ultimate pumpkin crisp starts with choosing the right ingredients for that perfect balance of flavors and textures. Let’s dive into the essentials!
Essential Ingredients for the Pumpkin Layer
To craft the delicious pumpkin layer, you’ll need:
- Canned Pumpkin: Opt for pure pumpkin puree — it’s convenient and gives a rich texture. Check out high-quality brands like Libby’s.
- Brown Sugar: This adds a deep, caramel-like sweetness that complements the pumpkin beautifully.
- Spices: Cinnamon, nutmeg, and ginger are classic choices that enhance the warm flavors.
- Evaporated Milk: This adds creaminess and richness, ensuring your pumpkin layer isn’t too dry.
Must-Have Ingredients for the Streusel Topping
The streusel topping is where the magic happens! Here’s what you need:
- Rolled Oats: They provide a hearty, chewy texture.
- Flour: All-purpose flour helps bind the topping together.
- Granulated Sugar: For a little sweetness to contrast the pumpkin.
- Butter: Use cold, unsalted butter for that crumbly texture; it makes all the difference.
By selecting quality ingredients, you’ll create a pumpkin crisp that’s sure to impress at your next gathering. For more tips on selecting the best pumpkin varieties, check out this resource. Happy baking!
Step-by-Step Preparation of Pumpkin Crisp
Making a delicious pumpkin crisp is one of those delightful experiences that can fill your kitchen with warmth and friends with joy, especially as the autumn season rolls in. Let’s roll up our sleeves and dive into the step-by-step preparation of this scrumptious dessert.
Gather Your Ingredients
Before we begin, it’s crucial to gather all the ingredients to make the process smoother and more enjoyable. Here’s what you’ll need for a delightful pumpkin crisp:
-
Pumpkin Layer:
-
1 can (15 oz) of pumpkin puree (not pumpkin pie filling)
-
1 cup of granulated sugar
-
1 teaspoon of cinnamon
-
1/2 teaspoon of nutmeg
-
1/4 teaspoon of ginger
-
1/4 teaspoon of salt
-
3 large eggs
-
1 can (12 oz) of evaporated milk
-
Streusel Topping:
-
1 cup of oats
-
1 cup of brown sugar, packed
-
1/2 cup of all-purpose flour
-
1/2 cup of unsalted butter, melted
-
1 teaspoon of cinnamon
By having everything ready, you can focus on creating the magic!
Preheat Your Oven
Now that you have your ingredients gathered, it’s time to preheat your oven to 350°F (175°C). This is important because a well-preheated oven will help ensure even cooking, allowing your pumpkin crisp to turn out perfectly without any soggy bottoms. While the oven gets cozy, take a moment to enjoy the earthy aroma of your pumpkin.
Make the Pumpkin Layer
Next comes the fun part! Start by mixing your pumpkin layer ingredients in a large bowl.
- Combine Dry Ingredients: In the bowl, whisk together the pumpkin puree, granulated sugar, cinnamon, nutmeg, ginger, and salt.
- Add Eggs: Beat in the eggs one at a time, incorporating them fully into the mixture.
- Pour in Evaporated Milk: Finally, stir in the evaporated milk until the mixture is smooth and creamy.
Make sure there are no lumps, and feel free to taste-test a spoonful. It’s essential to ensure that the flavors are to your liking. If you’re a big fan of pumpkin, you might want to check out this pumpkin recipe website for more inspiration.
Prepare the Streusel Topping
Now let’s get to that delicious streusel topping—it’s what makes pumpkin crisp irresistibly good!
- Mix the Dry Ingredients: In another bowl, combine the oats, brown sugar, flour, and cinnamon.
- Add Butter: Pour in the melted butter and use your hands or a fork to mix until crumbly. The texture should resemble wet sand—this is what ensures a crunchy topping that perfectly contrasts the creamy pumpkin layer.
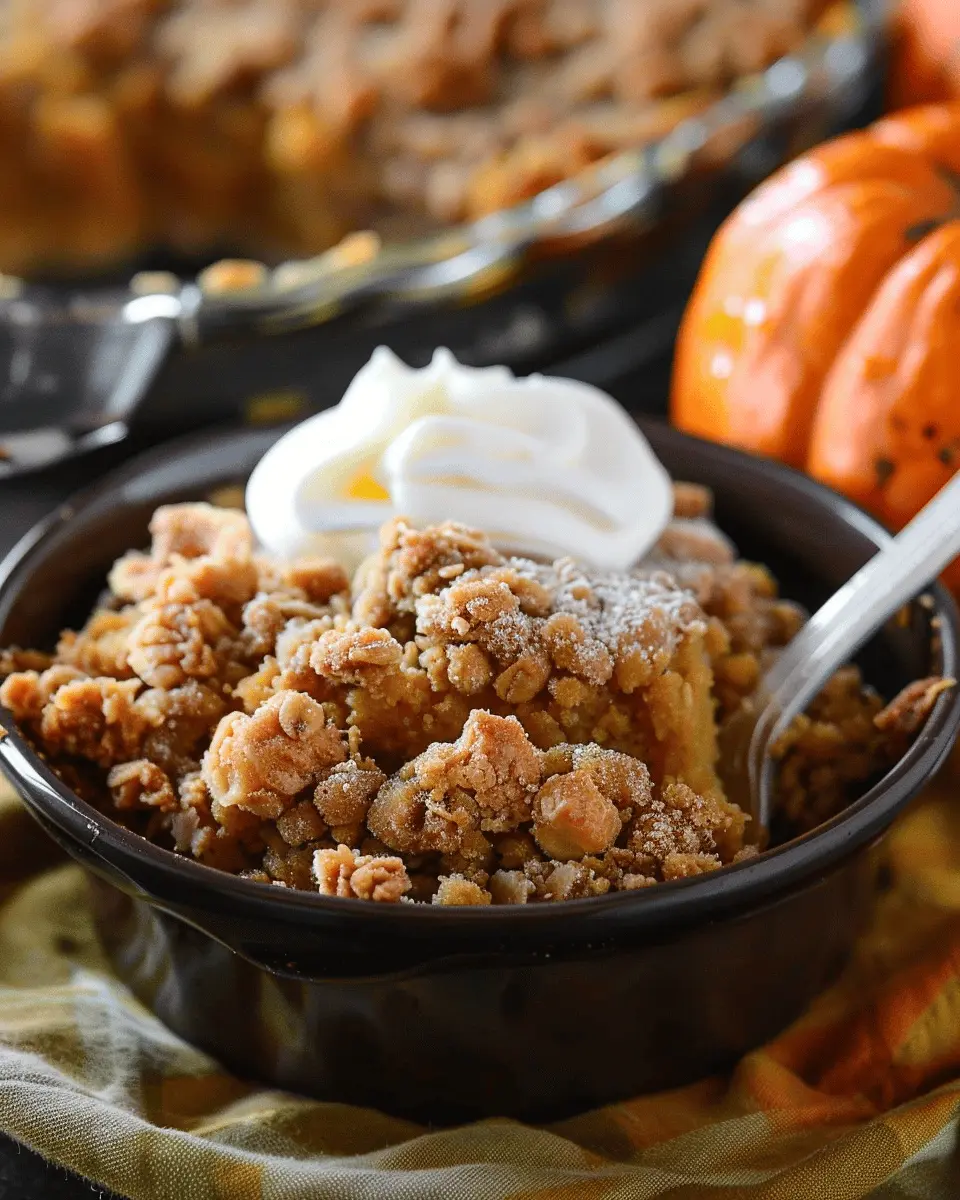
Assemble and Bake the Crisp
With the layers ready, it’s time to bring everything together!
- Layer Pumpkin Mixture: Pour the pumpkin mixture into a greased 9×13 inch baking dish, spreading it evenly.
- Top with Streusel: Generously sprinkle the streusel topping over the pumpkin layer, making sure to cover it completely. The more, the merrier—after all, who doesn’t love a good topping?
- Bake: Pop it into your preheated oven and bake for about 45-50 minutes, or until the edges are bubbling, and the center is set. A toothpick test in the center should come out clean.
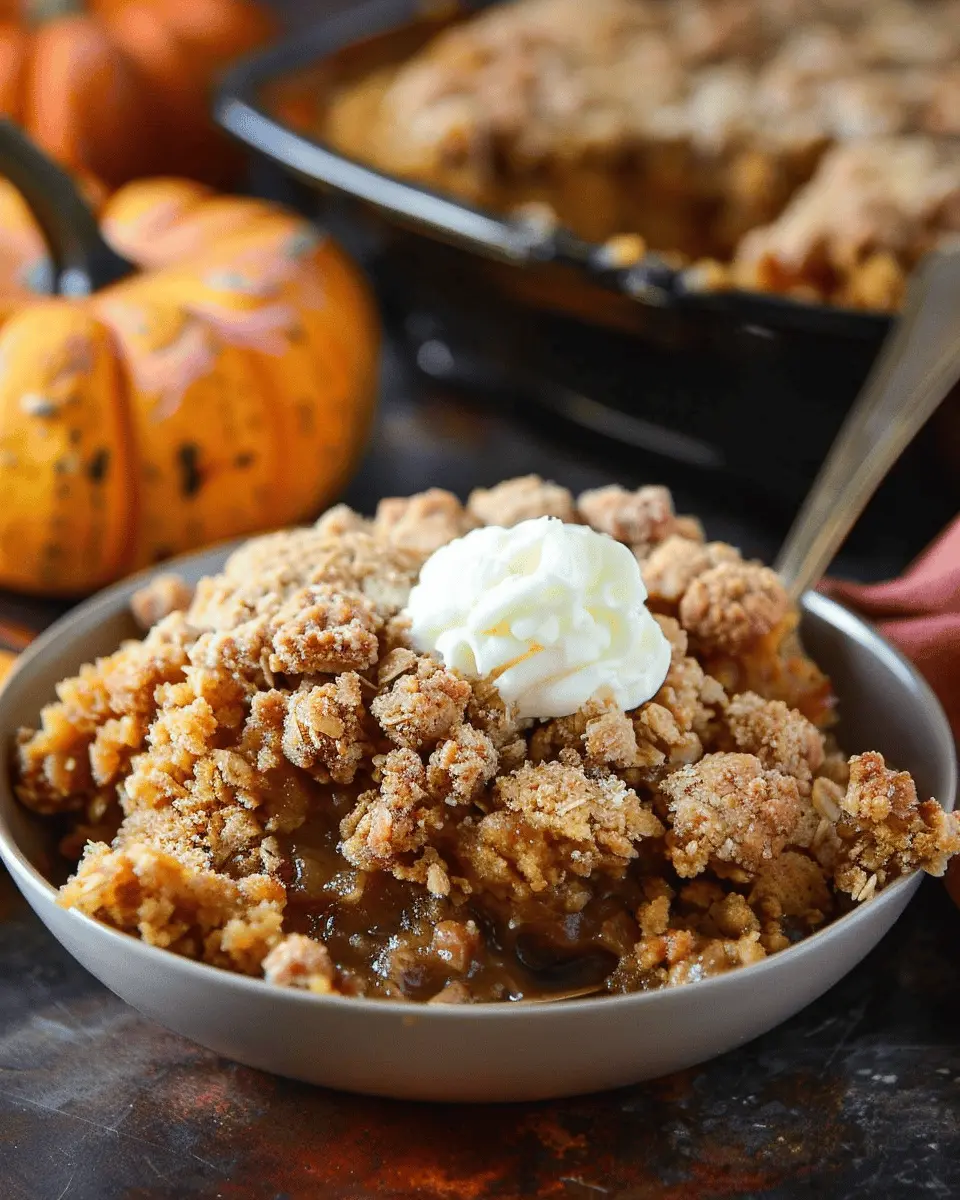
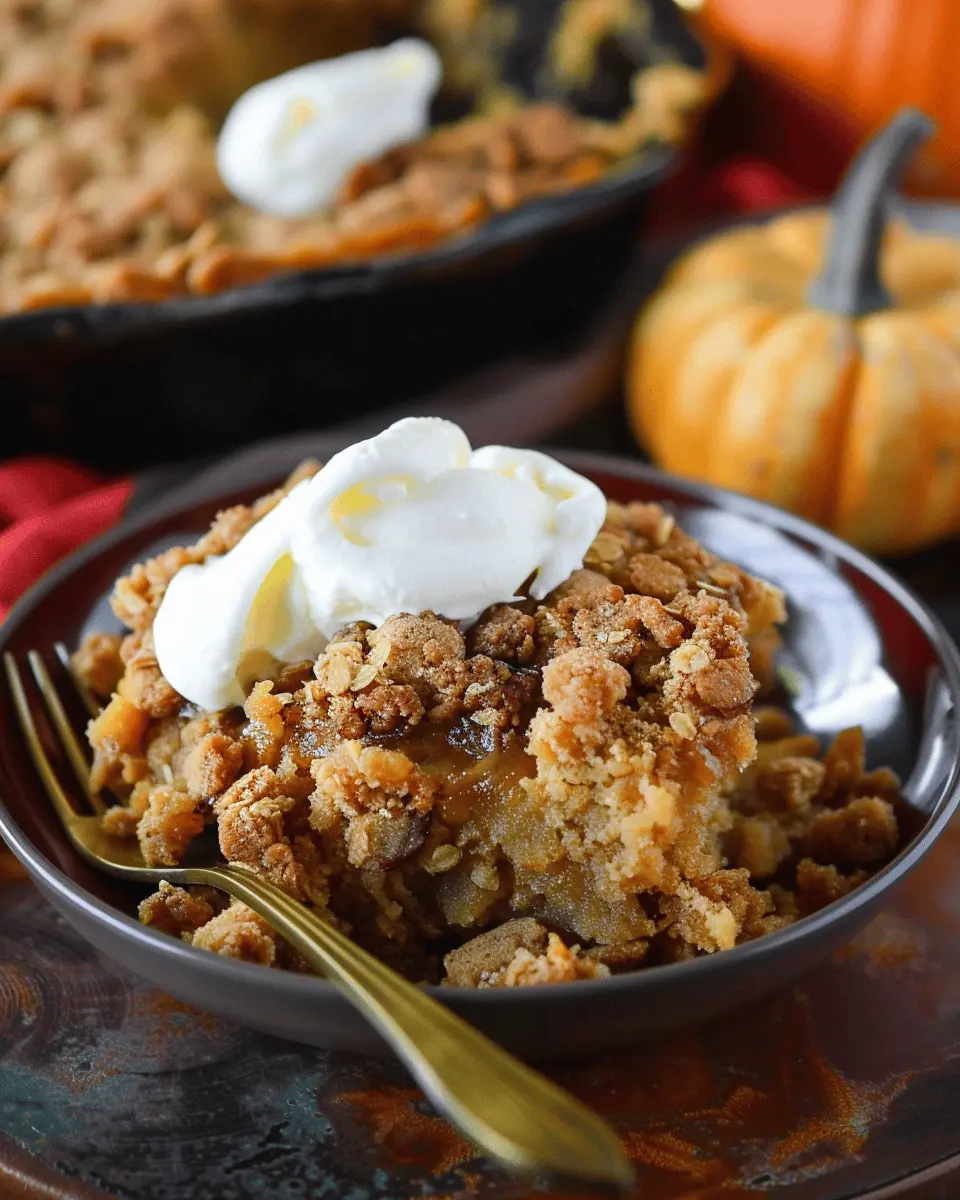
Once it’s out of the oven, let it cool for a bit before serving. You can enjoy your pumpkin crisp warm or cooled, topped with whipped cream or ice cream, if you’d like.
By following these steps, you’ll create a pumpkin crisp that everyone will love. So grab a fork and dig in; happiness is just a bite away!
Variations on Pumpkin Crisp
Enhancing your pumpkin crisp recipe is not only fun but allows you to experiment with flavors you adore. Here are two delightful variations that elevate this seasonal favorite!
Pumpkin Banana Crisp
Want to add a twist to your classic pumpkin crisp? Consider a Pumpkin Banana Crisp! The sweetness of ripe bananas complements the rich pumpkin flavor beautifully, creating a dessert that’s both comforting and unique. Here’s how to whip it up:
- Ingredients: Mix pumpkin puree with mashed bananas (2 medium bananas should do) before combining it with your typical spice blend and topping.
- Topping: Use your traditional oats and nuts, but consider adding a splash of vanilla or a sprinkle of cinnamon for an extra flavor dimension.
This fusion not only enhances the taste but also provides additional nutritional benefits, as bananas are rich in potassium and vitamins. Plus, the added moisture from the bananas creates a soft, luscious texture that you’ll love.
Gluten-Free Pumpkin Crisp
For those embracing a gluten-free lifestyle, you can still enjoy a delectable pumpkin crisp without the guilt. By making a few adjustments, you can satisfy your cravings easily:
- Swap the Flour: Use gluten-free oats combined with almond flour or coconut flour for your topping. Both options are not only gluten-free but lend a lovely nutty flavor.
- Binding: A bit of maple syrup or honey can hold your topping together perfectly while enhancing sweetness.
This version remains just as satisfying, proving that gluten-free doesn’t mean sacrificing flavor. If you’re looking for more gluten-free inspiration, websites like Gluten-Free Living offer excellent resources and recipes.
With these delicious variations, you’re set to impress at your next gathering or simply enjoy a heartfelt dessert at home! What’s stopping you from trying them out today?
Cooking Tips and Notes for Pumpkin Crisp
Best Practices for Ingredient Selection
When crafting your pumpkin crisp, selecting quality ingredients can make all the difference. Opt for fresh, pure pumpkin puree—canned is fine, but check the label. You want pumpkin without unnecessary additives. For the best flavor, use spices like cinnamon, nutmeg, and ginger from a reputable brand; fresh ground spices offer a depth that elevates the dish. Finally, when picking oats, go for whole rolled oats over instant. They give your crisp that delightful texture!
Troubleshooting Common Issues
If your pumpkin crisp turns out too watery, it could be due to excess moisture in the pumpkin puree. To remedy this, try draining the puree using a fine mesh strainer before mixing it into your recipe. Alternatively, if your crisp topping doesn’t brown as desired, you can pop it in the broiler for the last few minutes. Just keep a watchful eye to avoid burning! Remember, cooking is about adjustments, so embrace those little challenges. My first pumpkin crisp wasn’t perfect, but man, did I learn a lot!
For more ingredient tips, check out this guide on choosing the best components for your baking adventures.
Serving Suggestions for Pumpkin Crisp
Pairing with Ice Cream or Whipped Cream
One of the best ways to elevate your pumpkin crisp experience is by adding a scoop of vanilla ice cream or a generous dollop of whipped cream. The creaminess beautifully contrasts with the warm, spiced layers of the crisp. You might want to consider using cinnamon-infused whipped cream for an extra flavor kick, which you can easily whip up at home. Perfect for cozy gatherings, this combination invites a uniquely delightful blend of textures and flavors that guests will love. For a twist, why not try serving it with ginger ice cream? You can find great recipes at reputable sources like Serious Eats.
Creative Serving Ideas for Entertaining
If you’re entertaining, your pumpkin crisp presentation can turn heads! Consider portioning it into individual ramekins for a refined look, potentially garnishing each with a sprinkle of crushed pecans or a drizzle of caramel sauce. Arranging them on beautiful platters or even within a rustic wooden box can add an inviting aesthetic for your gathering. You could even serve it with spiced apple cider or a refreshing fall-inspired mocktail. Think apple and cranberry spritzer—a lovely complement to the flavors of your crisp! For more creative drink recipes, check out Epicurious.
By blending these suggestions into your gathering, not only will you please your palate, but you’ll also create lasting memories!
Time Breakdown for Pumpkin Crisp
Preparation Time
Getting started with your pumpkin crisp is easy! You’ll want to set aside about 15-20 minutes for preparation. This includes gathering your ingredients, measuring them out, and mixing everything together. Having a clear workspace makes this a breeze!
Baking Time
Once your mixture is prepped, it’s time for the magic to happen in the oven. Bake your pumpkin crisp for approximately 30-35 minutes. Keep an eye on it—nothing beats that glorious smell wafting through your home!
Total Time
In total, you’re looking at around 50-60 minutes from start to finish. Just enough time to enjoy a cup of coffee or tea while waiting for your delicious dessert. Trust me, it’ll be worth it! For more pumpkin recipes, check out this fantastic source to get inspired!
Nutritional Facts for Pumpkin Crisp
Estimated Calories and Serving Information
Pumpkin Crisp is more than just a delicious dessert; it’s also relatively friendly on the calorie scale! Each serving typically contains around 220-250 calories, depending on the ingredients and portion size. When sharing this delightful treat, consider cutting it into 8 servings to keep flavor without overindulging.
Key Nutritional Benefits
Looking for a tasty way to boost your nutrition? Pumpkin Crisp offers numerous advantages:
- Rich in Fiber: The pumpkin base adds a hearty dose of fiber, promoting digestive health.
- Low in Fat: With smart ingredient choices, like opting for turkey bacon as a topping, this dish remains lower in fat compared to traditional crisps.
- Packed with Vitamins: Pumpkin is an excellent source of vitamin A, supporting vision and immune function.
Incorporating foods like pumpkin into your diet not only satisfies your sweet tooth but also provides essential nutrients. Interested in learning more about the benefits of pumpkin? Check out this article from the American Heart Association.
By enjoying a slice of pumpkin crisp, you treat yourself while nurturing your body!
FAQ about Pumpkin Crisp
Can I use fresh pumpkin instead of canned?
Absolutely! Using fresh pumpkin in your pumpkin crisp can enhance the flavor and freshness of the dish. Just be sure to cook the pumpkin first — peel, chop, and steam it until tender, then puree it for a smooth texture. This is a great opportunity to showcase your kitchen skills, and you can even use those leftover pumpkin seeds for roasting!
How do I store leftover pumpkin crisp?
If you find yourself with leftover pumpkin crisp, don’t fret! Proper storage is key to enjoying this delicious dessert later. Cover it tightly with plastic wrap or transfer it to an airtight container. It can stay fresh in the refrigerator for about 3 to 4 days. If you’re looking to save it for a longer period, consider freezing it. Just ensure it’s well-wrapped to prevent freezer burn. When you’re ready to indulge again, simply thaw it in the fridge overnight and reheat in the oven for that fresh-out-of-the-oven taste.
What can I do with pumpkin crisp if I don’t have a cast iron skillet?
No cast iron skillet? No problem! You can easily adapt your pumpkin crisp recipe to any oven-safe dish. A 9×13-inch baking dish or any deep pie dish works wonderfully. The important thing is to ensure that whatever you use can handle oven heat. Just remember to keep an eye on your crisp while it bakes, as baking times might vary slightly.
If you’re looking for more pumpkin inspiration, check out seasonal recipes on sites like AllRecipes or Food Network. Happy baking!
Conclusion on Pumpkin Crisp
Why You Should Make Pumpkin Crisp This Season
As the temperatures drop and leaves begin to change, there’s no better time to indulge in a warm, comforting dessert like pumpkin crisp. This delightful dish offers the perfect balance of spices and sweetness, capturing the essence of fall in every bite. Not only is it quick and easy to prepare, but it also provides a terrific centerpiece for gatherings or cozy nights in.
Pumpkin crisp is a unique twist on traditional pumpkin pie, making it a refreshing option for gatherings. Plus, it’s adaptable—feel free to incorporate your favorite nuts or spices. So, why wait? Treat yourself and your loved ones to a scrumptious autumn dessert that’ll surely become a seasonal favorite. For more tips and variations, check out this helpful guide on fall desserts.
PrintPumpkin Crisp: The Best Cozy Dessert to Celebrate Fall

This Pumpkin Crisp is the perfect dessert to enjoy during the fall season.
- Prep Time: 15 minutes
- Cook Time: 35 minutes
- Total Time: 50 minutes
- Yield: 8 servings 1x
- Category: Dessert
- Method: Baking
- Cuisine: American
- Diet: Vegetarian
Ingredients
- 2 cups pumpkin puree
- 1 cup brown sugar
- 1 teaspoon cinnamon
- 1/2 teaspoon nutmeg
- 1 cup oats
- 1 cup flour
- 1/2 cup melted butter
Instructions
- Preheat the oven to 350°F (175°C).
- In a bowl, mix pumpkin, brown sugar, cinnamon, and nutmeg.
- Spread the pumpkin mixture in a baking dish.
- In another bowl, combine oats, flour, and melted butter to form a crumb topping.
- Spread the crumb topping over the pumpkin mixture.
- Bake for 30-35 minutes until golden brown.
Notes
- Serve warm with whipped cream.
- This dish can be made ahead of time and reheated.
Nutrition
- Serving Size: 1 serving
- Calories: 250
- Sugar: 15g
- Sodium: 150mg
- Fat: 10g
- Saturated Fat: 5g
- Unsaturated Fat: 3g
- Trans Fat: 0g
- Carbohydrates: 36g
- Fiber: 3g
- Protein: 3g
- Cholesterol: 20mg
Keywords: pumpkin, dessert, fall, cozy